# Admin Modules
Details the use of several Admin Modules
# Purpose/Overview
The main TNG\_coGenWeb site is structured such that the basic content of the site is obtained from a database containing multiple tables and records. To ensure that the latest content information is available in a structured and timely manner the admin side of the website is used to update the website records.
The following sections of this wiki 'book' are thus intended to provide guidance on the use of the admin modules and some helpful hints to facilitate module usage.
# Basic Module Structure
#### **Overview**
The basic structure of each admin module, except the Memorials module, consist of a top form area containing an input area for each of the related table's fields and a bottom table area containing all the records associated with the subject module.
##### **Form Area**
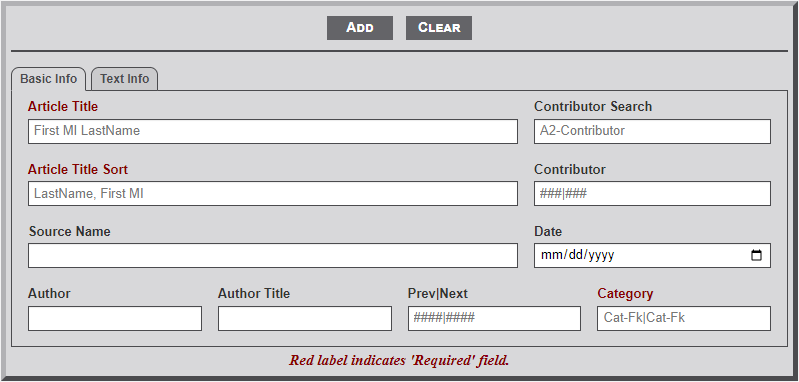
As shown in the below image, the Form Area consists of two parts... **Buttons** and **Input** fields.
[](https://wiki.txfannin.org/uploads/images/gallery/2024-09/articles-tab-1.png)
The **Buttons** above the line provide the ability to *Add - Edit - Delete - Clear* an individual record of the specific table.
1. To **Add** a record, first enter the record information in the fields provided. Note that on some fields the Label is indicated by red lettering. This indicates that the field is a required field. Thus, the module will not a*dd* the record to the database until information is entered in the field. (See more about field structure below.) Select the **Add** button *after* the information is entered to *add* the record to the database.
2. To **Edit** a record first select the desired record from the table below the form by locating the record and clicking on the table row. This will populate the form area with the information from the database table's record. Next, make any necessary changes to the record and then select the **Edit** button. Note that selecting a record for editing changes the form buttons by removing the **Add** button and adding a **Delete** button.
3. To **Delete** a record first select the desired record from the table below the form by locating the record and clicking on the table row. As with then populate the form area with the information from the database table's record. Next, select the **Delete** button. This will then display a confirmation dialog box to confirm the desire to *delete* the record. Select the Green **Delete** button or the Red **Cancel** button to confirm the desired action.
4. The **Clear** button is used to *clear* all the fields of the form and reset the table to the original state. (See more about the table status in the next section.)
---
The form **Input** area below the line contains input elements for all the fields of the associated table. There are several types of input elements. The types of input elements differs for each module as needed.
1. The **input** form element is used to enter information that has a finite length. Thus, the *input* area is restricted to the number of allowed records. *If longer information is needed in the field, contact the system administrator concerning the needed length*. Additionally, some fields are set to only allow letters and/or numbers. Fields with a alpha restriction are generally not indicated but it will be obvious if you try to enter a number that is not allowed. Fields that allow only numbers, or special characters, are indicated with a placeholder to indicate the restriction (e.g., ####|####).
2. The **textarea** form element is used for record fields that require long text information. These fields are noted by an increased height to the input area with a triangle in the lower right corner. Dragging the triangle down with increase the height of the field to allow viewing of more information. Some **textarea** fields also allow entering of HTML code and are so noted with a placeholder stating so.
3. The **select** form element is used to enter specific information required for the record. To obtain the desired information select the element and type the first few letters of the desired information. Note that the field will contain a placeholder indicating the number of letters required before the dropdown information will begin to display (e.g., A2-Something, indicates 2 letters). Entering more than the indicated number of letters will further restrict the number of items shown in the dropdown area. Once the desired information is shown in the dropdown area, select the item to have it entered into the **select** element field. Some **select** form elements are used for information only and are not part of the database table record. An example of this use is to obtain the Id number of a contributor. The Contributor field can accept multiple contributor Ids but in a specific format. Thus, the Contributor Select form element is used to obtain the separate contributor Ids.
4. The **datalist** form element is used to enter specific known information required for the record. This type form element is identified by a down arrow to the right of the element area. Selecting the element will display the list of available options. Some forms using this element will have a preset item selected.
5. The **date** form element is used on a few of the forms. This element is identified by the "mm/dd/yyyy" fields and a small calendar icon to the right in the element area. Selecting the icon will display a dropdown calendar set to the current date. Use the arrows to move from one month to the next. Selecting anywhere in the field, other than the calendar icon, will highlight the month. Entering the two digit month will automatically move the select area to the day area and likewise to the year field. Unfortunately, using this field will only allow full dates. Thus, if one of the date items are unknown this field cannon be used.
---
##### **Table Area**
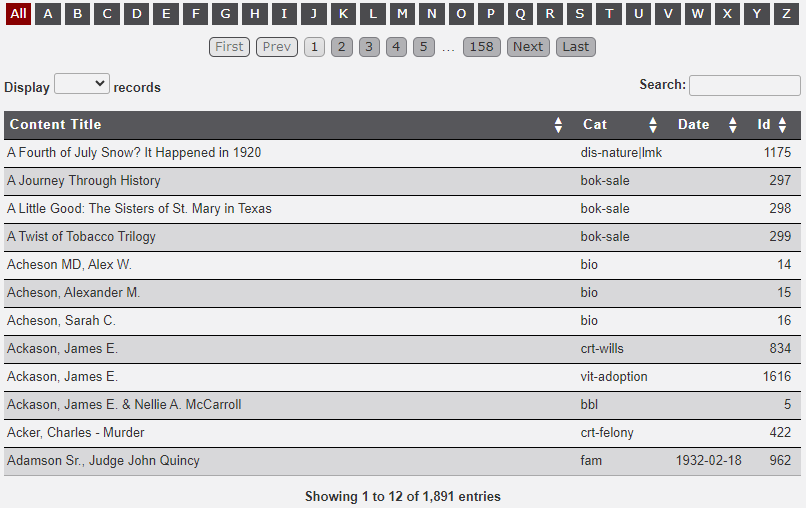
As shown in the below image, the Table Area consists of three parts... **Navigation**, **Records**, and **Information.**
**[](https://wiki.txfannin.org/uploads/images/gallery/2024-09/admin-table.png)**
The **Navigation** area includes an *Alphabet Bar*, *Pagination* buttons, *Display* dropdown, and *Search* input field.
1. The **Alphabet Bar** is used to filter the records displayed in the table. Moving the mouse to hover over a letter will display the number of records in the table that contain records with the hovered letter in the first letter of the first column. Selecting a letter will filter the records in the table to just those records that begin with the selected letter. Selecting the red **All** button will again display all the records.
2. The **Pagination** buttons are used to move through the table records one group at a time. The four outer buttons are used to move to the indicated name of the button (i.e., First, Prev(ious), Next, and Last). The numbered buttons are dynamic in that the number change as the pagination moves through the records. Selecting a number will thus 'jump' to the relative number of records. Note that this element may not display if the number of records to be displayed are fewer than the number of records indicated in the **Display** field (See next item).
3. The **Display** dropdown is used to increase/decrease the number of records displayed in the table by a preset number. Select a preset number as desired. This option may not be available on a table that is known to have a few records.
4. The **Search** input field is used to filter the records. Unlike the **Alphabet Bar** discussed above which only filters displayed records based on the first letter of the first column, the **Search** field filters records based on the search string entered that is found in any of the displayed columns. A good use of this feature is for selecting a specific record based on the known Id number. For example if you know the Id number is 1234, then by entering the number into the Search field will filter the records by the Ids. BUT... be aware that the filtering process will usually terminate the selection after only the first 3 characters entered. Therefore, not only will the record with Id 1234 be displayed but also 1230, 1231, etc. See the area below on use of the table area for more related to the **Search** feature. With a large number of records in a database table this is a very useful feature.
---
The **Records** area incudes the table *Heading* and *Rows* of records.
1. The table **Heading**, identified by the dark area with white text, not only indicates the column names but may also include arrow heads to indicate the ability to sort the column. If the column heading does include the arrow heads then by clicking on the column heading will sort the selected column as indicated by the arrows. Prior to sorting the column will display both an up arrow and a down arrow. Clicking once will sort the column item in ascending order. Clicking a second time will sort the column in descending order. Clicking a third time will return the column order to the original order. Note that with each sort request the arrows will change to display the sort order. The sorted column will also display in a shaded color to indicate the sort.
2. The **Rows** area of the table provides a subset of the records fields from the database table. The different modules of the admin area will display differing number of columns as needed to ensure the proper selecting of a record. To edit a specific record, locate the desired record in the table and select the desired row. This will then move all of the record fields to the form area discussed above. After editing or adding a record the updated information will be updated in the table.
---
##### **Information Area**
Below the **Table Area** is a brief **Information** area identifying the number of total records displayed an the total number of records in the table. If the Search feature is used to filter the records the display will also indicate the number of filtered records.
# Articles
#### **Purpose**
The **Articles** module is used to update the records of the *articles* table of the database. As the name implies, the *articles* table contains those records used throughout the website that provide the real content to each of the areas of the site.
#### **Overview**
As detailed in the **Basic Module Structure** page, the user interface to the module consists of two parts. See that page for a fuller explanation of the structure.
- The articles **Form** displayed at the top of the page, and
- The **Table** containing the records in the *articles* table.
---
#### **Form Usage**
As observed in the image below, the **Form Area** consists of two tabs.
##### **Basic Into Tab**
[](https://wiki.txfannin.org/uploads/images/gallery/2024-09/articles-tab-1.png)
1. **Article Title** – As the title implies this is the text to be used as the heading of the page. Thus, as in the example above… P. A. Ramsey & D. M. Ramsey. A total of 128 characters can be entered in the field.
2. **Article Title Sort** – This field indicates the text of the content that should be used for the display in the list of content displayed for the user. In the case of an article for other than a person, the **Article Title** and **Article Title Sort **fields should be the same. But as the above example illustrates, when the article is about an individual, the **Article Title Sort** field should begin with the last name, for sorting purposes. This field can also contain 128 characters.
3. **Contributor Search** – This is not a field of the *articles* table but a handy way to determine the key number of the contributor needed in the **Contributor** field below it. After entering two characters (that is the A2 hint in the text box) a dropdown list will appear containing the **Contributor** names that begin with the letters. Entering more letters will further filter the results. Also displayed in the dropdown is the Id number associated with the **Contributor**. Selecting an element in the dropdown list will display the information in the text area.
4. **Contributor** – This is used to identify the **contributor**(s) that provided the information for the content of this record. The contributors are identified by their Id number from the *contributor* table of the database. Use the **Contributor Search** field above to find the needed key number. If the search for the contributor does not provide a number, continue entering the other information and **Add/Edit** the record. Then go to the **Contributor Module** and add the new contributor. Finally, return to this module, find the just added record (see table discussion below) and update the record with the contributor information. Note: to indicate more than one contributor enter the first contributor number, followed by the pipe {‘|’) character, then the second contributor number. The field can contain 128 characters so a lot of contributors can be included.
5. **Source Name** – This field contains the source reference for the material of the article. Generally, a newspaper name or publication reference is used. The field can contain 128 characters.
6. **Date** – This field contains the date of the publication or other related date. The date field uses an HTML widget in the format mm/dd/yyyy. Unfortunately, with the widget partial dates cannot be entered.
7. **Author** – This field contains the name of the individual that authored the information from the publication. The field length is 64 characters.
8. **Author Title** – The title of the author is entered in this field. Generally, something like Editor, Staff Writer, etc. is used. The field length is 64 characters.
9. **Prev|Next** – This field provides the ability to link several articles together. Think of the articles as railroad cars in the railroad yard. Each car is unique but can be hooked together to form a train. Likewise, the articles are unique but can be linked together via this field to form a continuous chain of articles. It is all done by use of the article Id number. But two items are of importance. The identification of the first and last articles in the chain.
For example, maybe we have 3 articles that could be chained together ( 145 -> 914 -> 238 ) in that order. In article 145 the Prev|Next field would contain 0|914. In article 914 the Prev|Next would be 145|238. Article 145 being the previous article and 238 being the next article. In article 238 the Prev|Next would be 914|0. Article 914 being the previous article and 0 indicating no next article. If later you need to include a new article in the chain the Prev|Next field can be adjusted to accommodate the new article by adjusting the numbers accordingly. The two numbers in the field are used to display a **Prev** and **Next** button at the top of the article for the user.
10. **Category** – The *category* field is the heart of the entire website. It is used to determine which records are selected to display on the tables shown on the many areas of the site. The field consists of a basic 3-letter code to indicate the major area of importance. See the table in the Appendix for current codes and their meaning. In addition to the 3-letter code there may exist a subcode.
For example, the transportation area uses the 3-letter code ‘trs’ but also a subcode of ‘waterways’, ‘bridges’, ‘ferries’, etc. The subgroup is appended to the main group with a hyphen (e.g., trs-waterways). Multiple groups can be included by separating each one with a pipe (‘|’) character.
As stated above the 3-digit code is used to identify articles for listing on various pages of the website. But, in some cases it is not practical to list all the articles of a practical area. For example, in the *Books on-site* area there are many pages of a City Directory book, but for the main *Books on-site* page only the main page of the book with the table of contents should be in included in the list of books. Therefore, to **not** include a page in the main area list of articles, just prefix the category with an exclamation mark ( ! ) (e.g. !bok).
Another feature of the category field is linking articles to main entities (i.e., Cemeteries, Churches, Markers, Schools, and Towns) of the site. When an individual (e.g., Akers Cemetery) entity record is accessed the system searches the Contents table to gather those records that indicate an association with the entity. For example, an article detailing an event that happened in the town of Bells. Thus, a category with twn-008 (Bells Id) would be entered in the *Category* field. When the Bells town record is accessed, an accordion box will appear at the bottom of the town page with a link to the article. The same is true for the other major entity of the site. The field allows for 128 characters so multiple links can be provided (e.g., twn-008|chu-143|cem-014): links to a Town, Church, and Cemetery.
Finally, an article record can include a link to a memorial record by including a group as mem-nnnnnn, where nnnnnn is the memorial number. With such a group when the article is viewed the heading, which is usually an individuals name, will become a link to the memorial record.
---
##### **Text Info Tab**
[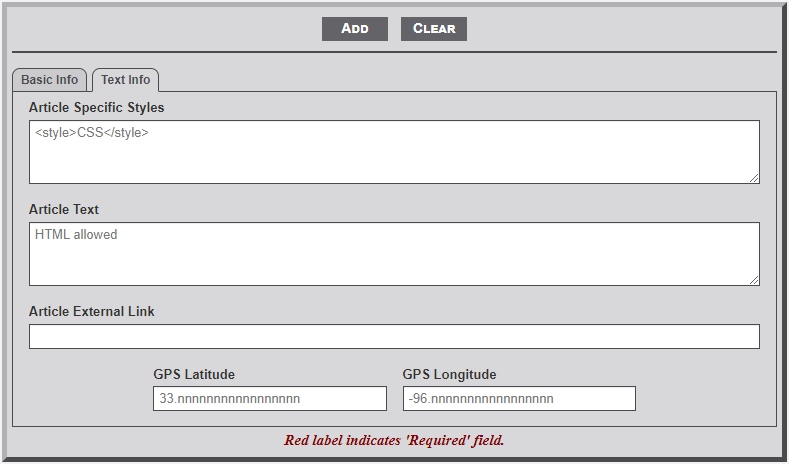](https://wiki.txfannin.org/uploads/images/gallery/2024-09/articles-tab-2.png)
1. **Article Specific Styles** – Sometimes it is necessary to provide additional CSS styling for a specific article. This field is used to do just that. As the field's placeholder identifies it is necessary to begin the CSS items with <style> and end the CSS string with </style>. It is important to ensure that the CSS code entered conforms to the structure and requirements of the CSS. Invalid CSS code will not be interpreted and thus not used. The CSS code entered will be appended to the beginning of the **Article Text**.
2. **Article Text** – This field contains the content of the *article*. As indicated by the fields placeholder, full HTML coding is allowed and encouraged.
3. **Article External Link** – Some articles are just links to external website. Copy the URL from the website and enter in the text area to facilitate the link. If the this link is used the *Article Text* box should be empty.
4. **GPS Latitude/Longitude** – Frequently it is beneficial to include the GPS coordinates of an entity included in an article (i.e., the location of a business or home). If the coordinates are included, text is added to the bottom of the article with a link to a Google map identifying the item.
# Cemeteries
#### **Purpose**
The **Cemeteries** admin module is used to *add*, *edit,* or *delete* individual cemetery records in the *cemeteries* table of the database.
#### **Overview**
The module contains multiple fields on the **Basic Info** and **Text Info** tabs for entering the desired information. See the **Basic Module Structure** page for detailed use of the *buttons* at the top, the *form*, and the *table* below the form.
---
#### **Basic Info - Tab 1**
[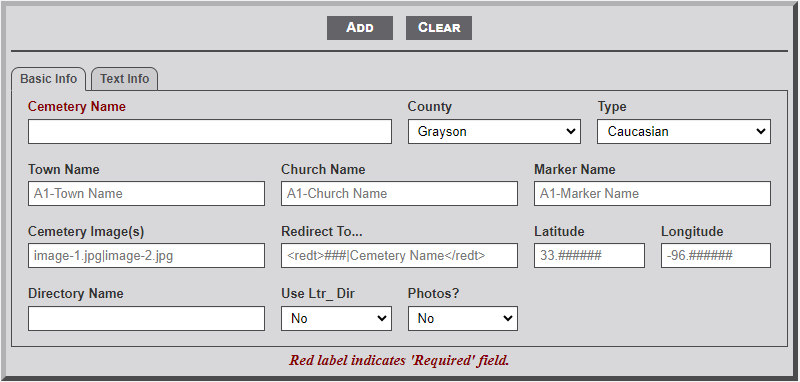](https://wiki.txfannin.org/uploads/images/gallery/2024-09/cemeteries-tab-1.png)
##### **Input Fields**
1. **Cemetery Name** - Enter the name as it should appear on the main cemetery page. This is a required field.
2. **County** - Use the dropdown box to select the name of the county where the cemetery is located. Grayson Co. is preset as the default.
3. **Type** - From the dropdown select the type of cemetery: Caucasian, African-American, Mixed, or Unused.
4. **Town Name** - After entering one letter of the town name a dropdown menu will appear listing the town names that begin with the entered letters. Continue to type the name to further filter the selection list. Select the desired name from the list.
5. **Church Name** - As with the Town Name, select the desired church name from the list.
6. **Marker Name** - As with the Town Name, select the desired Marker name from the list.
7. **Cemetery Image(s)** - Enter the names of the image(s) that will display on the main cemetery page. Separate the name with the pipe (|) character. Only two images are allowed. The path is not required.
- Since these images are not part of a memorial record the name should being with an underscore character (\_).
- The images are assumed to be located in the main cemetery folder (e.g., images/cem\_name/\_image\_name.jpg).
- If the **Use Ltr\_ Dir** (see below)) is indicated then the path would include the Ltr\_\_ folder
(e.g., images/cem\_name/Ltr\_\_/\_image\_name.jpg). **Note:** the Ltr\_\_ subfolder is Ltr followed by two underscores characters (e.g., Ltr\_\_).
8. **Redirect To...** - Some cemetery names identified in the table are simply AKA (Also Known As). Thus, this field is used to redirect any request for this cemetery to the actual cemetery. If this is the case, enter the following pseudo code in this field (e.g., <redt>xxx|Cemetery Name</redt>) where xxx is the cemetery Id number. Also, enter a note \[e.g., (see cemetery name)\] after the cemetery name in the **Cemetery Name** field.
9. **Latitude** - If known, add the GPS latitude coordinate in this field. **Note:** the placeholder format for the entry. First two digits must be 33, followed by a period and six digits. If the Lat/Lon coordinates are entered the shadow box to the right of the cemetery image will display a small map showing the location with a link below the map to a Google map with the location.
10. **Longitude** - If known, add the GPS longitude coordinate in this field. **Note:** the placeholder format for the entry. First three digits must be -96, followed by a period and six digits.
11. **Directory Name** - Enter the name of the cemetery directory that is located within the *cem\_Images* folder.The name must be all lower case letters with an underscore between names (e.g., west\_hill). The prefix **cem\_** is automatically prepended to the name and so must not be included.
12. **Use Ltr\_ Dir** - Some cemetery image folders contain a large number of images. Thus, to enable easier location of images a Ltr\_? folder structure is used. All images relating to a specific memorial record are placed in a Ltr\_? folder, where the ? is a capital letter of the first letter of the file name. Use the dropdown selection to indicate whether the cemetery folder is subdivided into *Ltr* sub-folders.
13. **Photos** - Use the dropdown to indicate whether the majority of the cemetery memorials contain tombstone photos. Selecting Yes will display a camera icon on the line with the cemetery name.
---
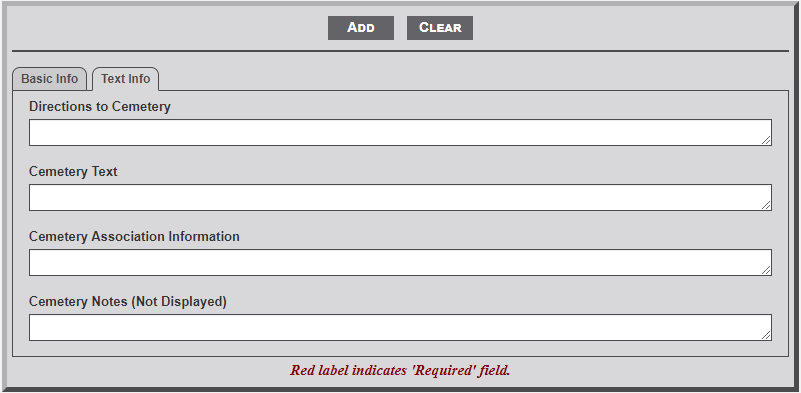
#### **Text Info - Tab 2**
**[](https://wiki.txfannin.org/uploads/images/gallery/2024-09/cemeteries-tab-2.png)**
##### **Input Fields**
1. **Directions to Cemetery** - Enter the directions from a specific location to the entrance of the cemetery. The specific point could be a known location (town square) or highway intersection. Be sure to indicate direction and distance from one point to the next. The text will appear in the shadow box to the right of the cemetery image on the individual cemetery page.
2. **Cemetery Text** - Enter the text about the cemetery history or other important information relating to the cemetery. The text will appear below the line on the individual cemetery page.
3. **Cemetery Association Information** - This field is used to provide additional information about an association of the cemetery. Useful information would be contact name, email address, and/or mailing address. The text will appear in the shadow box to the right of the right of the cemetery image on the individual cemetery page.
4. **Cemetery Notes (Not Displayed)** - Any information entered here is not display but serves as a place to enter additional information related to the cemetery (e.g. contact information for the private property owner which you don't what displayed on the page but might want to find later if a researcher wants to visit the cemetery; Name of person who actually sells the plots for folks trying to get on when Mama dies, etc.)
# Churches
#### **Purpose**
The **Churches** admin module is used to *add*, *edit,* or *delete* individual cemetery records in the *churches* table of the database.
#### **Overview**
The module contains multiple fields on the **Basic Info** and **Text Info** tabs for entering the desired information. See the **Basic Module Structure** page for detailed use of the *buttons* at the top, the *form*, and the *table* below the form.
---
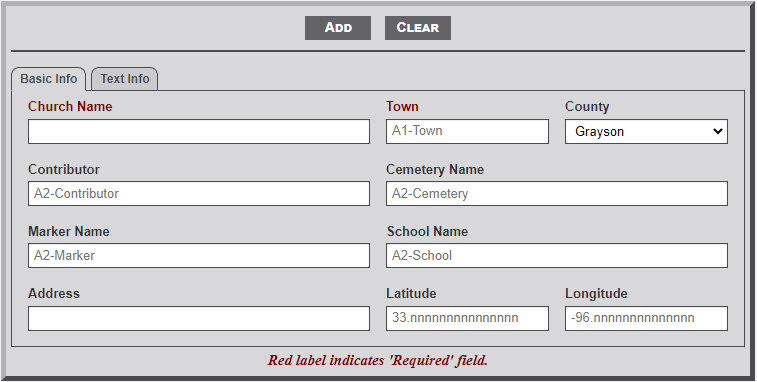
#### **Basic Info - Tab 1**
**[](https://wiki.txfannin.org/uploads/images/gallery/2024-09/churches-tab-1.png)**
##### **Input Fields**
1. **Church Name** - Enter the name of the church as it appears on the church sign or printed material.
2. **Town** - After entering one letter of the town name a dropdown menu will appear listing the town names that begin with the entered letters. Continue to type the name to further filter the selection list. Select the desired town name from the list.
3. **County** - Use the dropdown menu to select the county in which the church resides. Grayson Co. is set as the default.
4. **Contributor -** After entering two letters of the contributor's last name a dropdown menu will appear listing the contributor names that begin with the entered letters. Continue to type the name to further filter the selection list. Select the desired contributor name from the list. The contributor's name will appear on the individual church page.
5. **Cemetery Name** - In some cases the *church* will be associated with a specific *cemetery*, most usually located on the church property. After entering two letters of the *cemetery's name* a dropdown menu will appear listing the cemetery names that begin with the entered letters. Continue to type the name to further filter the selection list. Select the desired *cemetery name* from the list. The cemetery name is used to display a link to the *cemetery* record in the text area below the line on the individual church page.
6. **Marker Name** - In some cases the *church* will be associated with an *Historical Marker*. After entering two letters of the marker's name a dropdown menu will appear listing the marker names that begin with the entered letters. Continue to type the name to further filter the selection list. Select the desired *marker name* from the list. The *marker* name is used to display a link to the *marker* record in the text area below the line on the individual church page.
7. **School Name - O**n some occasions it might be the case that the *church* is associated with a *school*. After entering two letters of the school's name a dropdown menu will appear listing the school names that begin with the entered letters. Continue to type the name to further filter the selection list. Select the desired *school name* from the list. The *school* name is used to display a link to the *school* record in the text area below the line on the individual church page.
8. **Address** - Enter the address of the school.
9. **Latitude -** If known, add the GPS latitude coordinate in this field. **Note:** the placeholder format for the entry. First two digits must be 33, followed by a period and six digits.
10. **Longitude** - If known, add the GPS longitude coordinate in this field. **Note:** the placeholder format for the entry. First three digits must be -96, followed by a period and six digits.
If the Lat/Lon coordinates are entered the shadow box to the right of the cemetery image will display a small map showing the location with a link below the map to a Google map with the location.
---
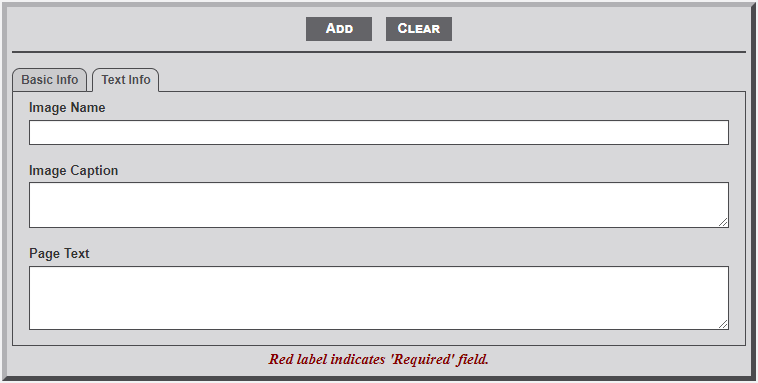
#### **Text Info - Tab 2**
**[](https://wiki.txfannin.org/uploads/images/gallery/2024-09/churches-tab-2.png)**
##### **Input Fields**
1. **Image Name** - Enter the name of the image to be displayed on the individual church page. All church images should be stored in the *chu\_images* subfolder of the main *images* folder.
2. **Image Caption** - Enter a caption to appear below the image of the church.
3. **Page Text** - This field is used to enter church related information that will display below the line on the individual church page. A short history of the church is most appropriate. HTML is allowed.
# Contributors
#### **Purpose**
The **Contributor** admin module is used to *add*, *edit,* or *delete* individual contributor records in the *contributor* table of the database. The contributor information is generally included on pages that were provided by the individual. To include a specific contributor simply include the contributor number in a text field enclosed by pipe ( | ) characters. Some modules include a field to indicate the contributor.
#### **Overview**
See the **Basic Module Structure** page for detailed use of the *buttons* at the top, the *form*, and the *table* below the form.
---
#### **Input Fields**
[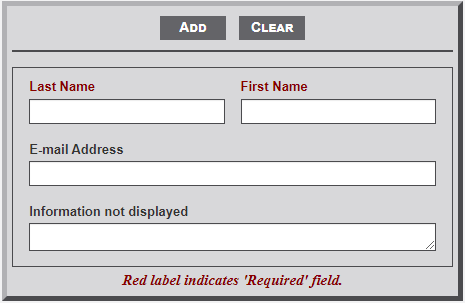](https://wiki.txfannin.org/uploads/images/gallery/2024-09/contributors.png)
1. **Last Name** - Enter the last name of the contributor. This is a **required **field.
2. **First Name**- Enter the first name of the contributor. This is a **required **field.
3. **E-mail Address**- If known enter the e-mail address of the individual
4. **Information not Displayed** - Use this field to enter information about the contributor that is not displayed but may be useful at a later date.
# Markers
#### **Purpose**
The **Markers** admin module is used to *add*, *edit,* or *delete* individual cemetery records in the *markers* table of the database.
#### **Overview**
The module contains multiple fields on the **Basic Info** and **Text Info** tabs for entering the desired information. See the **Basic Module Structure** page for detailed use of the *buttons* at the top, the *form*, and the *table* below the form.
---
#### **Basic Info - Tab 1**
[](https://wiki.txfannin.org/uploads/images/gallery/2024-09/markers-tab-1.png)
##### **Input Fields**
1. **Official Marker Name** - Enter the name of the marker as it appears on the [Texas Historical Commission](https://thc.texas.gov/preserve/preservation-programs/historical-markers) website. This is a **required** field.
2. **Name for Sorting** - In some cases using the *Official Marker Name* makes it more difficult to find a specific *marker* in a list of marker names (e.g., The Smith House). Use this field to enter a name that would make the marker easier to find in a list of markers (e.g., Smith House). This is a **required** field.
3. **Cemetery Name** - In some cases the *marker* will be associated with a specific *cemetery*. After entering two letters of the *cemetery's name* a dropdown menu will appear listing the cemetery names that begin with the entered letters. Continue to type the name to further filter the selection list. Select the desired *cemetery name* from the list. The cemetery name is used to display a link to the *cemetery* record in the text area below the line on the individual marker page.
4. **Church Name** - In some cases the *marker* will be associated with a *church*. After entering two letters of the church's name a dropdown menu will appear listing the church names that begin with the entered letters. Continue to type the name to further filter the selection list. Select the desired *church name* from the list. The *church* name is used to display a link to the *church* record in the text area below the line on the individual marker page.
5. **School Name** - In some cases the *marker* will be associated with an *Historical Marker*. After entering two letters of the school's name a dropdown menu will appear listing the school names that begin with the entered letters. Continue to type the name to further filter the selection list. Select the desired *school name* from the list. The *school* name is used to display a link to the *school* record in the text area below the line on the individual marker page.
6. **Town Name-In/Near** - In some cases the *marker* will be associated with an *Town*. After entering two letters of the town's name a dropdown menu will appear listing the town names that begin with the entered letters. Continue to type the name to further filter the selection list. Select the desired *town name* from the list. The *town* name is used to display a link to the *town* record in the text area below the line on the individual church page.
7. **Marker Image** - Enter the name of the image of the marker. All marker images must be located in the *mkr\_images* subfolder of the *images* folder. As such, only the image name is required, not the full path. This is a **required** field.
8. **Latitude -** If known, add the GPS latitude coordinate in this field. **Note:** the placeholder format for the entry. First two digits must be 33, followed by a period and six digits.
9. **Longitude** - If known, add the GPS longitude coordinate in this field. **Note:** the placeholder format for the entry. First three digits must be -96, followed by a period and six digits.
If the Lat/Lon coordinates are entered the shadow box to the right of the marker image will display a small map showing the location with a link below the map to a Google map with the location.
---
#### **Text Info - Tab 2**
[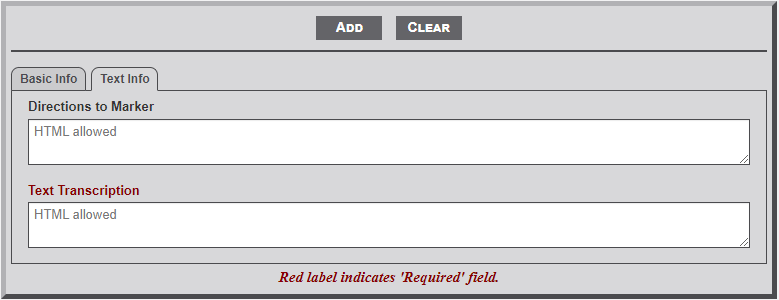](https://wiki.txfannin.org/uploads/images/gallery/2024-09/markers-tab-2.png)
##### **Input Fields**
1. **Directions to Marker** - Enter the directions from a specific location to the location of the marker. The specific location could be a known location (town square) or highway intersection. Be sure to indicate direction and distance from one point to the next. The text will appear in the shadow box to the right of the cemetery image on the individual marker page.
2. **Text Transcription** - Enter the text transcription of the marker's text. This is a **required** field.
# Memorials
#### **Overview**
The **Memorials** admin module is used to *add*, *edit*, or *delete* records from the *memorials* table of the database. For a detailed discussion on the use of admin modules see the **xxx **page. Unlike the other admin modules, this memorials modules does not include a table for selecting specific records.
---
#### **Above the Line Boxes & Buttons**
**[](https://wiki.txfannin.org/uploads/images/gallery/2024-09/memorials-buttons.png)**
These input boxes and buttons appear above the line for all active tabs.
1. ****Contributor** - When entering the Image Credit information, the Submitter Id number is often not remembered. This field is used to obtain the number. The information is not entered into the form but simply provided as a reference to the number.
**
2. **Display Button** - After entering a number in the Grayson Id field, the Display button is used to load the elements of the record into the associated fields of the Memorial form. Pressing the Enter key when the Grayson Id field is active will cause the Display button to activate.
3. **Grayson Id** - The Grayson Id number is a 5-digit number that uniquely identifies the record number of an individual. Enter the number in this field and press the Display button or the Enter key to load the desired record into the fields.
4. **Surname Search** - If the Grayson Id number is unknown, use this field to search for the desired record. Enter at least the first four characters of the last name to display a list of record numbers and names. Entering more characters will filter the name list. Selecting a name from the list will load the Id number in the Id field. Pressing the Display button or using the Enter key will then load the record into the fields. CAUTION: This is also a good way to locate relatives when completing the Relations information on Tab 5. Selection an item from the dropdown list at this time will as stated load the information into the fields and thus over-write the information you entered. Just note the number and enter it into the relations field.
5. **Add Button** - After all the known information on a new individual is enter, use the Add button the enter the fields into the database.
6. **Edit Button** - The Edit button is used to update/edit the information of a previously entered individual. The button is only displayed after a record number is entered into the Grayson Id field and the Display button or Enter key is used.
7. **Delete Button** - The Delete button is used to remove a record from the Memorial table in the database. The button is only displayed if the user has Admin access.
8. **Clear Button** - The Clear button is used to remove the information from the form fields.
---
#### **Tab 1 - Basic Info**
The information provided on this tab describes the individual's basic life information. It is important that as much detail as can be obtained is included in the identified fields.
[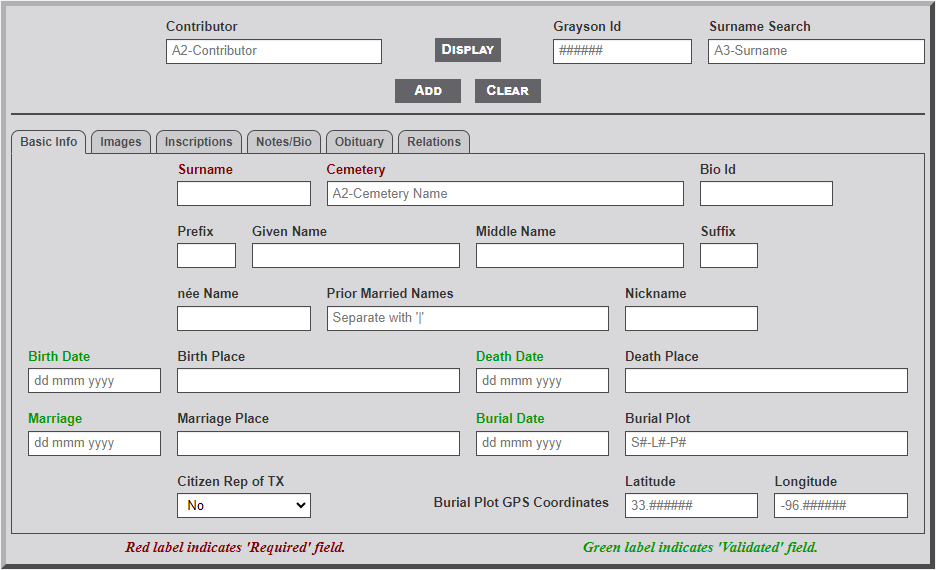](https://wiki.txfannin.org/uploads/images/gallery/2024-09/memorials-tab-1.png)
##### **Individual Fields**
1. **Surname** - Last name of the individual. This is a required field and cannot be left blank. Only letters (A-Z, a-z), a question mark ( ? ), a dash ( - ) character, and the period ( . ) character are allowed in the field.
2. **Cemetery** - Identifies the Grayson county cemetery where the individual is buried. This is a required field and cannot be left blank. Select the cemetery name from the list of cemeteries provided. To see a partial list of the cemeteries enter the first few (at least two are required) letters of the cemetery name. From the list provided select the desired cemetery. The cemetery name will then appear in the field.
3. **BioId** - Biography page ID number of the individual. Only digits (0-9) are allowed.
4. **Prefix** - Military, clergy, or medical identifier of individual (e.g., Rev., Dr., Col, 2Lt, etc.).
5. **Given Name** - Given (first) name of the individual.
6. **Middle Name** - Middle name(s) of the individual. If individual has more than one name enter both.
7. **Suffix** - Generational identifier of individual (i.e., Sr., Jr., or II, III, etc.). Can also include medical identifier (i.e., M.D. or D.D.S).
8. **ńee Name** - Woman's maiden name. Maiden name is displayed in italic before surname.
9. **Prior Married Names** - Prior married name of woman. If multiple prior names exists enter with pipe character between names (e.g., Smith|Jones). Names are displayed in parenthesis, separated by dash \[e.g., Sally Ann Jones (Smith-Evans) Jackson\].
10. **Nickname** - Generally used name for the individual (i.e., Bill for William).
11. **Birth Date** - Birth date of the individual. See the Formatting Dates section below for more information on dates.
12. **Birth Place** - Birth place in the format City, County Co., ST. Do a little research to determine the county and state. Use the two letter state abbreviation. Abbreviate the County as Co. (with the period).
13. **Death Date** - Death date of the individual. See the Formatting Dates section below for more information on dates.
14. **Death Place** - Death place in the format as indicated above.
15. **Marriage Date** - Marriage date of the individual. See the Formatting Dates section below for more information on dates.
16. **Marriage Place** - Marriage place as indicated above.
17. **Burial Date** - Burial date of the individual. See the Formatting Dates section below for more information on dates.
18. **Burial Plot** - Many cemeteries will have a structure for identifying the burial plot. This is generally of the format Section, Lot and Plot. The field is free form but some structure should be established for consistency.
19. **Citizen Rep of TX** - Indicator as to whether the individual was a Citizen of the Republic of Texas. The field provides a dropdown selection of Yes or No. No is the default. Change to Yes as needed.
20. **Burial Plot Latitude** - The GPS latitude of the burial plot is identified with a 6-digit decimal format (e.g., xx.nnnnnn, where xx can only be 33).
21. **Burial Plot Longitude**- The GPS longitude of the burial is identified with a negative 6-digit format (e.g., -xx.nnnnnn, where xx can only be 95 or 96).
**Formatting Dates**
- The normal date format is of the form dd mmm yyyy. If only the month and or year are known then mmm yyyy, or yyyy are also acceptable. The following date formats are also acceptable.
- ca dd mmm yyyy, ca mmm yyyy, and ca yyyy, where the 'ca' indicates approximately.
- abt dd mmm yyyy, abt mmm yyyy, and abt yyyy, where the 'abt' indicates about. Aft and Bef can also be used to indicate After or Before.
- Any of the above formats can be enclosed in brackets '\[ \]' to indicate the date is not certain.
- Finally, the following text are also allowed: **NBD**, **NDD**, **Infant**, **No Stone**, **See Notes**, **Unreadable**, **Broken Stone**, and **Buried Stone**, where *NBD* indicates *No Birth Date*, and *NDD* indicates *No Death Date*.
---
#### **Tab 2 - Images**
The fields on this tab are used to indicate the various types of images used across the system. Enter only the file name of the image.
[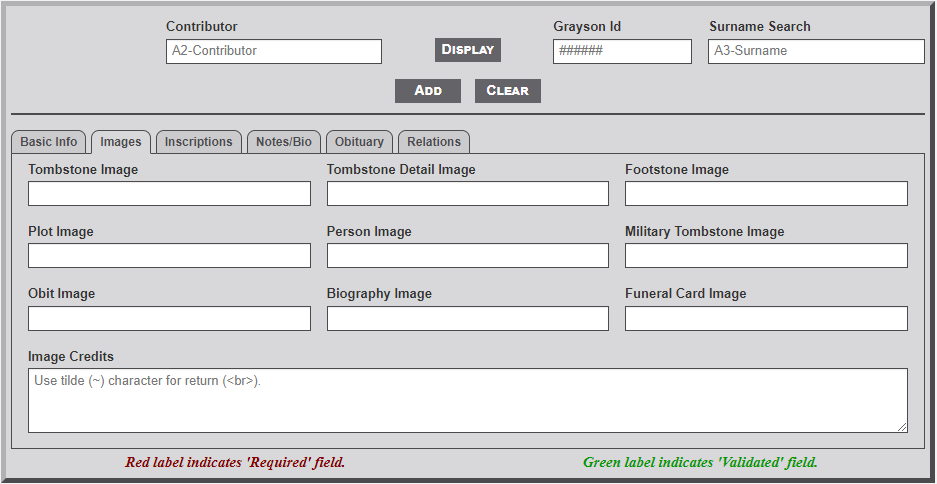](https://wiki.txfannin.org/uploads/images/gallery/2024-09/memorials-tab-2.png)
##### **Individual Fields**
1. **Tombstone** - File name of the tombstone marker image for the individual. This is generally a full image photo of the tombstone.
2. **Tombstone Detail** - File name of the tombstone detail. This image is a close-up of the tombstone showing the name and dates only.
3. **Footstone** - File name of the footstone marker image of the burial plot.
4. **Plot** - File name of the plot image. This is is generally a wide-angle view of the burial plot and surrounding area.
5. **Person** - File name of the personal image of the individual.
6. **Military Tombstone** - File name of the military marker image of the individual.
7. **Obit** - File name of the published image of the obituary. See the Image section below for additional information related to images.
8. **Biography** - File name of the published image of the Biography or related photos for the individual. See the Image section below for additional information related to images.
9. **Funeral Card** - File name of the Funeral Home Card used at the memorial or graveside service. See the Image section below for additional information related to images.
10. **Image Credits** - This field is used to enter the source/credit information for individual images. Enter text that identifies the type of photo and the contributor (e.g., Tombstone photo provided by Bob Smith, used by permission.). If the contributor is included in the database *contributor* table then include the *contributor Id* number rather than the name (e.g., Tombstone photo provided by |24|, used by permission.).
**Entering Image Names**
The website follows a somewhat loose structure for naming memorial images. For ease of reference the file name should begin with the last name of the individual and include at least the first name. Each name should be separated with the underscore character (\_). Although not required it is beneficial to include one of the following codes at the end of the name. as follows: lastname\_firstname\_xxx.jpg, where xxx is a code for the type image.
1. **tbs** - tombstone
2. **dtl** - tombstone detail
3. **fst** - footstone
4. **plt** - plot
5. **pic** - personal picture
6. **mil** - military
7. **obt** - obituary
8. **bio** - biography
9. **fhc** - funeral home card
- If a code is not included, the file is assumed to represent a tombstone.
- Selecting the alt-n keys with an image field selected will create an image name in the field in the system format.
- Do not include the path to the file name (e.g., lastname\_firstname\_code.jpg only).
- Multiple images can be included by separating the file names with a pipe ( | ) character.
- The first image of the *Tombstone Image* field is placed above the link buttons on the memorial record.
---
#### **Tab 3 - Inscriptions**
The fields on this tab are used to provide a transcription of the tombstone and military notes of interest. HTML tags are not allowed in the fields.
[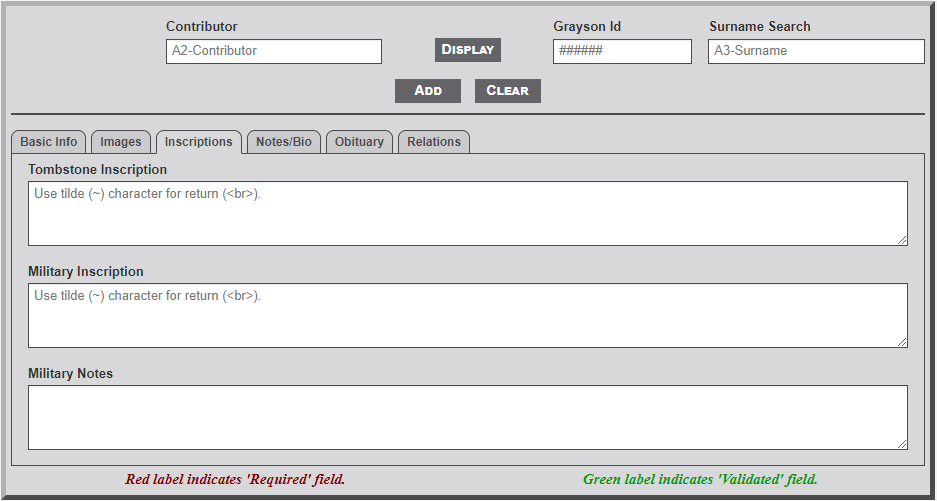](https://wiki.txfannin.org/uploads/images/gallery/2024-09/memorials-tab-3.png)
##### **Individual Fields**
1. **Tombstone Inscription** - Text of the tombstone inscription. Enter the inscription from as written. The tilde ( ~ ) character can be used to begin a new line.
2. **Military Inscription** - Text of the military inscription on the tombstone. Enter the inscription as written. The tilde ( ~ ) character can be used to begin a new line.
3. **Military Notes** - Text of military information related to the individual. Military information is often provided in the obituary. Statements such as, "He served in US Army in World War II" in the obituary should be included in this field. The main site section for Military Information uses this field to select individual records for display.
---
##### **Tab 4 - Notes/Bio**
The fields on this tab are used to provide additional research notes, Death Certificate transcription, Obituary records, and Biography information.
[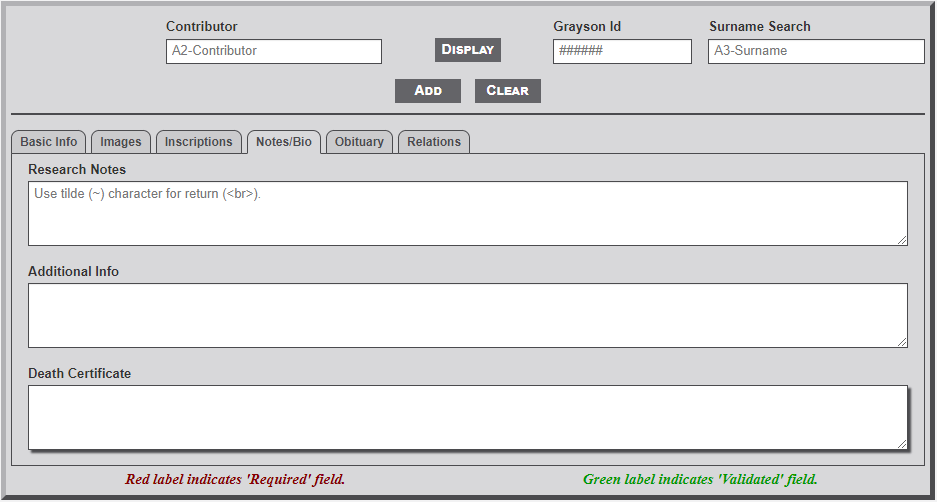](https://wiki.txfannin.org/uploads/images/gallery/2024-09/memorials-tab-4.png)
##### **Individual Fields**
1. **Research Notes** - Text of any research notes relative to the individual. Information generally included in this field relates to the source of other information within the record, For example, stating that the middle name of an individual was obtained from the obituary of a relative.
2. **Additional Info** - This field is used to include any additional information that is relevant to the individual. The field will accept HTML code for formatting. The tilde ( ~ ) character can be used for end/beginning of paragraph (e.g., the tilde character replaces the paired HTML tags of </p><p>).
3. **Death Certificate** - Transcribed state death certificate for the individual. Generally the source for Death Certificates is either the Texas State Department of Health or Death Certificate records. Both are found at the *FamilySearch.com* website. See the Appendix section for template form available for use.
---
#### **Tab 5 - Obituary**
[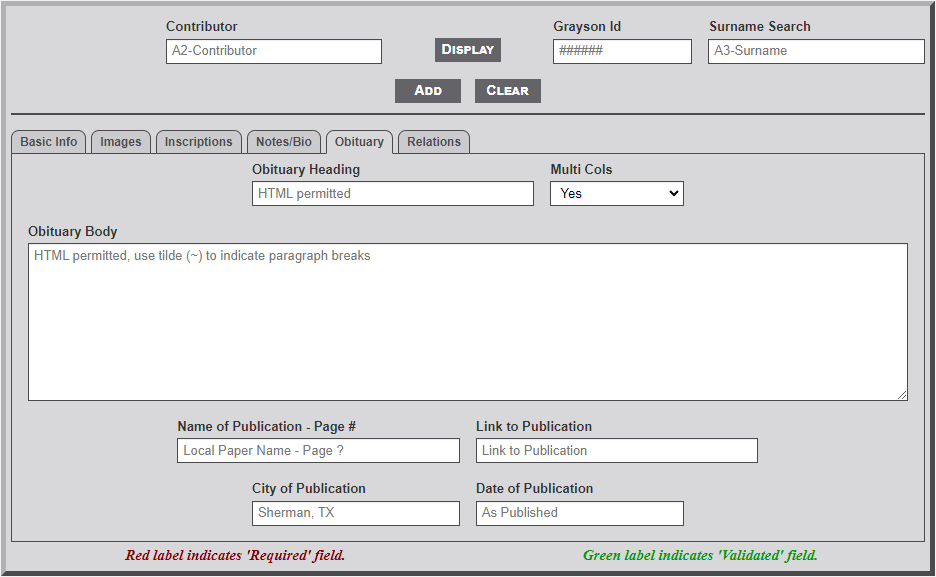](https://wiki.txfannin.org/uploads/images/gallery/2024-09/memorials-tab-5.png)
##### **Individual Fields**
1. **Obituary Heading** - This is the heading (i.e., Name of the individual) that will display at the top of the obituary.
2. **Multi Cols** - This indicates whether the obituary should display in one or two column format. Generally, shorter obituaries should display in single column format and longer obituaries in dual column format.
3. **Obituary Body** - This is the main body of the obituary. HTML formatting is allowed in this field. Note that rather using the normal <p></p> around a paragraph the tilde (~) character can be used to replace the paragraph end and start tags (e.g., ~ is replace with </p><p>. Don't forget to include the paragraph start tag, <p> before the first paragraph. And also, the paragraph end tag, </p> at the end of the last paragraph.
4. **Name of Publication** - Name of the publication, if known (e.g., Denison Herald). Enter the page number here also.
5. **Link to Publication** - Include a link to the publication.
6. **City of Publication** - City where the obituary was published, (e.g., Sherman, TX)
7. **Date of Publication** - Date of the publication (e.g., March 20, 2024)
---
#### **Tab 6 - Relations**
The Relations fields are used to identify next of kin relatives of the individual.
[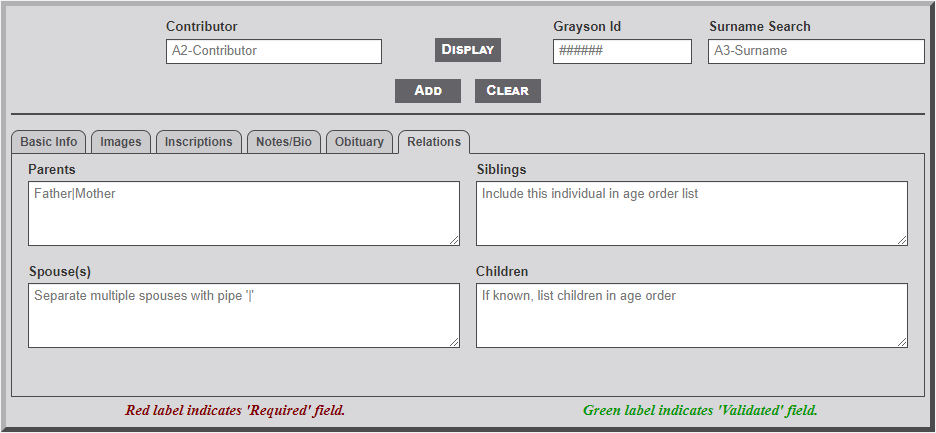](https://wiki.txfannin.org/uploads/images/gallery/2024-09/memorials-tab-6.png)
##### **Individual Fields**
1. **Parents** - Names or Memorial ID numbers for the parents of the individual. See the section below for details on entering relations.
2. **Siblings** - Names or Memorial ID numbers for the siblings of the individual. See the section below for details on entering relations.
3. **Spouse** - Name(s) or Memorial ID number(s) for the spouse of the individual. See the section below for details on entering relations.
4. **Children** - Names or Memorial ID numbers for the children of the individual. See the section below for details on entering relations.
**Entering Relations**
Relations may be entered in one of three ways...
1. If the relative is still living enter the full name. If known, enter the maiden name of the relative, as... <em>Maiden Name</em>. This will cause the maiden name to appear in italic (e.g., Mary Jane <em>Smith</em> Jones will display as Mary Jane Smith Jones).
2. If the relative is buried in the county and has a Memorial record simply enter the record ID number. Use the Search Name input box as mentioned above to quickly search for the Id number of the relative. Caution: When using the Search Name box do not select the name found in the list as this will populate the form with the information from the selected record. Simply make note of the relatives number for entering it into the desired relations field.
3. If the relative is deceased but not buried in the county go to the *FiindAGrave.com* website to locate the *FaG* record number. If not found simply enter the full name as indicated above. If found enter the *FaG* memorial number as follows... <fg "m=nnnnnnnnnnn">Name of Relative</fg>, where nnnnnnnnnnn is the *FaG* memorial number.
- Separate individual relatives with the pipe ( | ) character.
- When entering the siblings include the memorial Id of the individual in the list. Use the Family Search website to locate census records to determine the genealogical order of the siblings.
- Occasionally there may be a need in the Children field to further identify specific children of multiple spouses. This is accomplished by specific tags as follows: <s1></s1>|Child1|Child2|<s2></s2>|Child3|<s3>|</s3>|Child4.
- It may occasionally be necessary in the Sibling field to indicate half-siblings of the individual. This is accomplished using a special tag structure... Sibling1|Sibling2|<hs></hs>|Sibling3.
- To verify an entry in any of the fields simply select the desired Id number and select the F2 key (PC) or F7 key (Mac). This will display the number and name at the bottom of the form.
# Schools
#### **Purpose**
The **Schools** admin module is used to *add*, *edit,* or *delete* individual cemetery records in the *schools* table of the database.
#### **Overview**
The module contains multiple fields on the **Basic Info** and **Text Info** tabs for entering the desired information. See the **Basic Module Structure** page for detailed use of the *buttons* at the top, the *form*, and the *table* below the form.
---
#### **Basic Info - Tab 1**
[](https://wiki.txfannin.org/uploads/images/gallery/2024-09/schools-tab-1.png)
##### **Input Fields**
1. **School Name** - Enter the name as it should appear on the individual school page. This is a **required** field.
2. **District** - Enter the name of the district associated with the school.
3. **Dates** - Enter the dates that the school existed (e.g., Jun 1893 - Dec 1902).
4. **Town Name** - After entering one letter of the town name a dropdown menu will appear listing the town names that begin with the entered letters. Continue to type the name to further filter the selection list. Select the desired name from the list.
5. **Historical Marker** - As with the Town Name, select the desired Marker name from the list.
6. **Cemetery Name** - As with the Town Name, select the desired Marker name from the list.
7. **Church Name** - As with the Town Name, select the desired Marker name from the list.
---
#### **Text Info - Tab 2**
[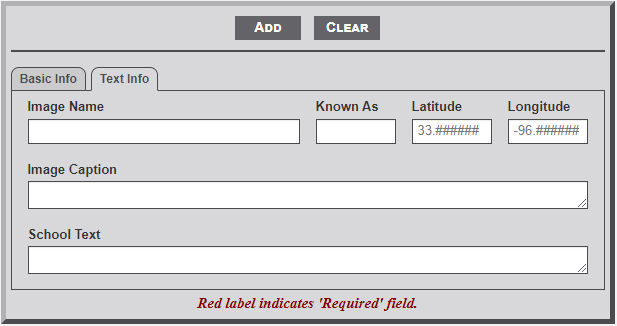](https://wiki.txfannin.org/uploads/images/gallery/2024-09/schools-tab-2.png)
1. **Image Name** - Enter the image name of the photo that will display on the individual school page. All school images must be located in the *sch\_images* subfolder of the main *images* folder. Thus, only enter the image name and not the full path.
2. **Known As** - This field is used to provide additional information about an association of the cemetery. Useful information would be contact name, email address, and/or mailing address. The text will appear in the shadow box to the right of the right of the cemetery image on the individual cemetery page.
3. **Latitude** - If known, add the GPS latitude coordinate in this field. **Note:** the placeholder format for the entry. First two digits must be 33, followed by a period and six digits.
**Note:** If the Lat/Lon coordinates are entered the shadow box to the right of the cemetery image will display a small map showing the location with a link below the map to a Google map with the location.
4. **Longitude** - If known, add the GPS longitude coordinate in this field. **Note:** the placeholder format for the entry. First three digits must be -96, followed by a period and six digits.
5. **Image Caption** - Enter the text for a caption that will display below the image of the school on the individual school page.
6. **School Text** - This field is used to enter school related information that will display below the line on the individual school page. A short history of the school is most appropriate. HTML is allowed.
# Towns
#### **Purpose**
The **Churches** admin module is used to *add*, *edit,* or *delete* individual cemetery records in the *churches* table of the database.
#### **Overview**
The module contains multiple fields on the **Basic Info** and **Text Info** tabs for entering the desired information. See the **Basic Module Structure** page for detailed use of the *buttons* at the top, the *form*, and the *table* below the form.
---
#### **Basic Info - Tab 1**
[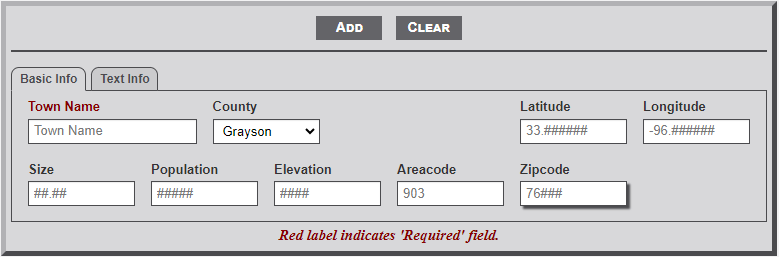](https://wiki.txfannin.org/uploads/images/gallery/2024-09/towns-tab-1.png)
##### **Input Fields**
1. **Town Name** - Enter the name of the town as it appears on present or historic maps.
2. **County** - Use the dropdown menu to select the county in which the town resides. Grayson Co. is set as the default.
3. **Latitude -** If known, add the GPS latitude coordinate in this field. **Note:** the placeholder format for the entry. First two digits must be 33, followed by a period and six digits.
**Note:** If the Lat/Lon coordinates are entered the shadow box to the right of the cemetery image will display a small map showing the location with a link below the map to a Google map with the location.
4. **Longitude** - If known, add the GPS longitude coordinate in this field. **Note:** the placeholder format for the entry. First three digits must be -96, followed by a period and six digits.
5. **Size** - Enter the town size in units of square miles. This information can be found on the wiki page for the town.
6. **Population** - Enter the town population based on the latest census. This information can be found on the wiki page for the town.
7. **Elevation** - Enter the town elevation. This information can be found on the wiki page for the town.
8. **Areacode** - Enter the town areacode. This information can be found on the wiki page for the town.
9. **Zipcode** - Enter the town zipcode. This information can be found on the wiki page for the town.
---
#### **Text Info - Tab 2**
[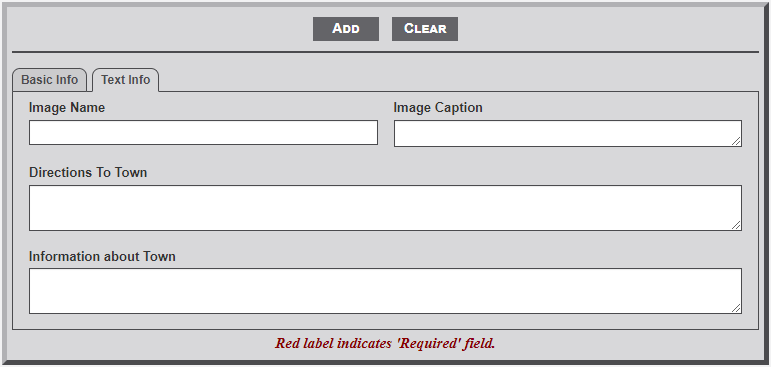](https://wiki.txfannin.org/uploads/images/gallery/2024-09/towns-tab-2.png)
##### **Input Fields**
1. **Image Name** - Enter the name of the image to be displayed on the individual town page. All town images should be stored in the *twn\_images* subfolder of the main *images* folder.
2. **Image Caption** - Enter a caption to appear below the image of the town.
3. **Directions to Town** - Enter the directions from a specific location to the town. The specific point could be a known location (town square) or highway intersection. Be sure to indicate direction and distance from one point to the next. The text will appear in the shadow box to the right of the town image on the individual town page.
4. **Information about Town** - This field is used to enter town related information that will display below the line on the individual town page. A short history of the town is most appropriate. HTML is allowed.