Cemeteries
Purpose
The Cemeteries admin module is used to add, edit, or delete individual cemetery records in the cemeteries table of the database.
Overview
The module contains multiple fields on the Basic Info and Text Info tabs for entering the desired information. See the Basic Module Structure page for detailed use of the buttons at the top, the form, and the table below the form.
Basic Info - Tab 1
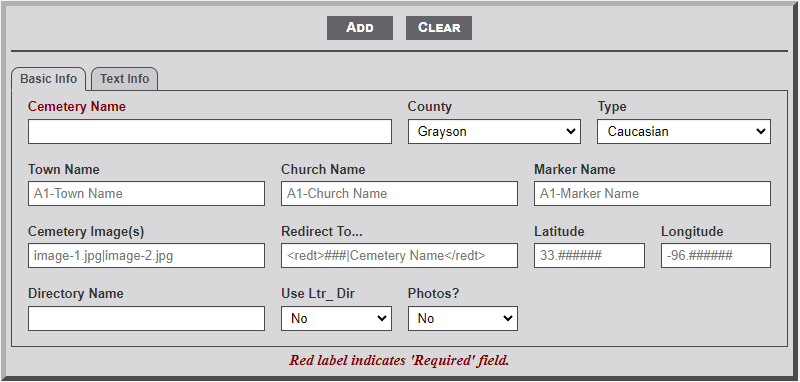
Input Fields
- Cemetery Name - Enter the name as it should appear on the main cemetery page. This is a required field.
- County - Use the dropdown box to select the name of the county where the cemetery is located. Grayson Co. is preset as the default.
- Type - From the dropdown select the type of cemetery: Caucasian, African-American, Mixed, or Unused.
- Town Name - After entering one letter of the town name a dropdown menu will appear listing the town names that begin with the entered letters. Continue to type the name to further filter the selection list. Select the desired name from the list.
- Church Name - As with the Town Name, select the desired church name from the list.
- Marker Name - As with the Town Name, select the desired Marker name from the list.
- Cemetery Image(s) - Enter the names of the image(s) that will display on the main cemetery page. Separate the name with the pipe (|) character. Only two images are allowed. The path is not required.
- Since these images are not part of a memorial record the name should being with an underscore character (_).
- The images are assumed to be located in the main cemetery folder (e.g., images/cem_name/_image_name.jpg).
- If the Use Ltr_ Dir (see below)) is indicated then the path would include the Ltr__ folder
(e.g., images/cem_name/Ltr__/_image_name.jpg). Note: the Ltr__ subfolder is Ltr followed by two underscores characters (e.g., Ltr__).
- Redirect To... - Some cemetery names identified in the table are simply AKA (Also Known As). Thus, this field is used to redirect any request for this cemetery to the actual cemetery. If this is the case, enter the following pseudo code in this field (e.g., <redt>xxx|Cemetery Name</redt>) where xxx is the cemetery Id number. Also, enter a note [e.g., (see cemetery name)] after the cemetery name in the Cemetery Name field.
- Latitude - If known, add the GPS latitude coordinate in this field. Note: the placeholder format for the entry. First two digits must be 33, followed by a period and six digits. If the Lat/Lon coordinates are entered the shadow box to the right of the cemetery image will display a small map showing the location with a link below the map to a Google map with the location.
- Longitude - If known, add the GPS longitude coordinate in this field. Note: the placeholder format for the entry. First three digits must be -96, followed by a period and six digits.
- Directory Name - Enter the name of the cemetery directory that is located within the cem_Images folder.The name must be all lower case letters with an underscore between names (e.g., west_hill). The prefix cem_ is automatically prepended to the name and so must not be included.
- Use Ltr_ Dir - Some cemetery image folders contain a large number of images. Thus, to enable easier location of images a Ltr_? folder structure is used. All images relating to a specific memorial record are placed in a Ltr_? folder, where the ? is a capital letter of the first letter of the file name. Use the dropdown selection to indicate whether the cemetery folder is subdivided into Ltr sub-folders.
- Photos - Use the dropdown to indicate whether the majority of the cemetery memorials contain tombstone photos. Selecting Yes will display a camera icon on the line with the cemetery name.
Text Info - Tab 2
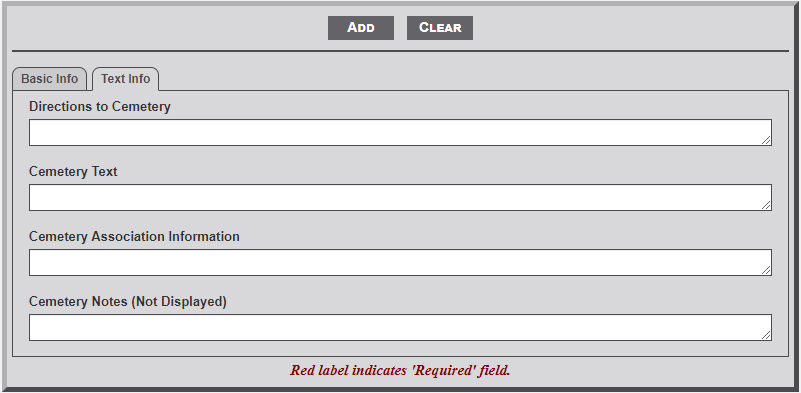
Input Fields
- Directions to Cemetery - Enter the directions from a specific location to the entrance of the cemetery. The specific point could be a known location (town square) or highway intersection. Be sure to indicate direction and distance from one point to the next. The text will appear in the shadow box to the right of the cemetery image on the individual cemetery page.
- Cemetery Text - Enter the text about the cemetery history or other important information relating to the cemetery. The text will appear below the line on the individual cemetery page.
- Cemetery Association Information - This field is used to provide additional information about an association of the cemetery. Useful information would be contact name, email address, and/or mailing address. The text will appear in the shadow box to the right of the right of the cemetery image on the individual cemetery page.
- Cemetery Notes (Not Displayed) - Any information entered here is not display but serves as a place to enter additional information related to the cemetery (e.g. contact information for the private property owner which you don't what displayed on the page but might want to find later if a researcher wants to visit the cemetery; Name of person who actually sells the plots for folks trying to get on when Mama dies, etc.)
No Comments