Memorials
Overview
The Memorials admin module is used to add, edit, or delete records from the memorials table of the database. For a detailed discussion on the use of admin modules see the xxx page. Unlike the other admin modules, this memorials modules does not include a table for selecting specific records.
Above the Line Boxes & Buttons

These input boxes and buttons appear above the line for all active tabs.
- Contributor - When entering the Image Credit information, the Submitter Id number is often not remembered. This field is used to obtain the number. The information is not entered into the form but simply provided as a reference to the number.
- Display Button - After entering a number in the Grayson Id field, the Display button is used to load the elements of the record into the associated fields of the Memorial form. Pressing the Enter key when the Grayson Id field is active will cause the Display button to activate.
- Grayson Id - The Grayson Id number is a 5-digit number that uniquely identifies the record number of an individual. Enter the number in this field and press the Display button or the Enter key to load the desired record into the fields.
- Surname Search - If the Grayson Id number is unknown, use this field to search for the desired record. Enter at least the first four characters of the last name to display a list of record numbers and names. Entering more characters will filter the name list. Selecting a name from the list will load the Id number in the Id field. Pressing the Display button or using the Enter key will then load the record into the fields. CAUTION: This is also a good way to locate relatives when completing the Relations information on Tab 5. Selection an item from the dropdown list at this time will as stated load the information into the fields and thus over-write the information you entered. Just note the number and enter it into the relations field.
- Add Button - After all the known information on a new individual is enter, use the Add button the enter the fields into the database.
- Edit Button - The Edit button is used to update/edit the information of a previously entered individual. The button is only displayed after a record number is entered into the Grayson Id field and the Display button or Enter key is used.
- Delete Button - The Delete button is used to remove a record from the Memorial table in the database. The button is only displayed if the user has Admin access.
- Clear Button - The Clear button is used to remove the information from the form fields.
Tab 1 - Basic Info
The information provided on this tab describes the individual's basic life information. It is important that as much detail as can be obtained is included in the identified fields.
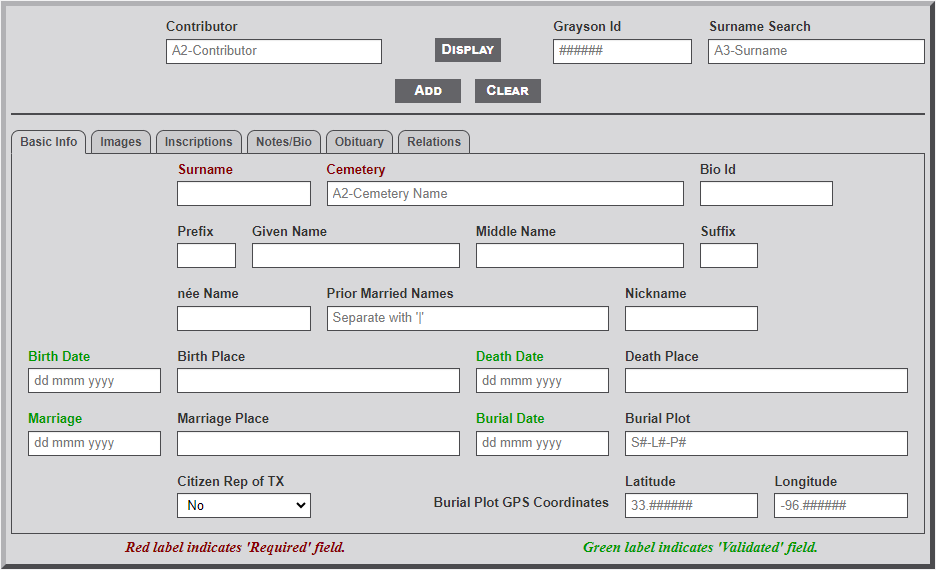
Individual Fields
- Surname - Last name of the individual. This is a required field and cannot be left blank. Only letters (A-Z, a-z), a question mark ( ? ), a dash ( - ) character, and the period ( . ) character are allowed in the field.
- Cemetery - Identifies the Grayson county cemetery where the individual is buried. This is a required field and cannot be left blank. Select the cemetery name from the list of cemeteries provided. To see a partial list of the cemeteries enter the first few (at least two are required) letters of the cemetery name. From the list provided select the desired cemetery. The cemetery name will then appear in the field.
- BioId - Biography page ID number of the individual. Only digits (0-9) are allowed.
- Prefix - Military, clergy, or medical identifier of individual (e.g., Rev., Dr., Col, 2Lt, etc.).
- Given Name - Given (first) name of the individual.
- Middle Name - Middle name(s) of the individual. If individual has more than one name enter both.
- Suffix - Generational identifier of individual (i.e., Sr., Jr., or II, III, etc.). Can also include medical identifier (i.e., M.D. or D.D.S).
- ńee Name - Woman's maiden name. Maiden name is displayed in italic before surname.
- Prior Married Names - Prior married name of woman. If multiple prior names exists enter with pipe character between names (e.g., Smith|Jones). Names are displayed in parenthesis, separated by dash [e.g., Sally Ann Jones (Smith-Evans) Jackson].
- Nickname - Generally used name for the individual (i.e., Bill for William).
- Birth Date - Birth date of the individual. See the Formatting Dates section below for more information on dates.
- Birth Place - Birth place in the format City, County Co., ST. Do a little research to determine the county and state. Use the two letter state abbreviation. Abbreviate the County as Co. (with the period).
- Death Date - Death date of the individual. See the Formatting Dates section below for more information on dates.
- Death Place - Death place in the format as indicated above.
- Marriage Date - Marriage date of the individual. See the Formatting Dates section below for more information on dates.
- Marriage Place - Marriage place as indicated above.
- Burial Date - Burial date of the individual. See the Formatting Dates section below for more information on dates.
- Burial Plot - Many cemeteries will have a structure for identifying the burial plot. This is generally of the format Section, Lot and Plot. The field is free form but some structure should be established for consistency.
- Citizen Rep of TX - Indicator as to whether the individual was a Citizen of the Republic of Texas. The field provides a dropdown selection of Yes or No. No is the default. Change to Yes as needed.
- Burial Plot Latitude - The GPS latitude of the burial plot is identified with a 6-digit decimal format (e.g., xx.nnnnnn, where xx can only be 33).
- Burial Plot Longitude- The GPS longitude of the burial is identified with a negative 6-digit format (e.g., -xx.nnnnnn, where xx can only be 95 or 96).
Formatting Dates
- The normal date format is of the form dd mmm yyyy. If only the month and or year are known then mmm yyyy, or yyyy are also acceptable. The following date formats are also acceptable.
- ca dd mmm yyyy, ca mmm yyyy, and ca yyyy, where the 'ca' indicates approximately.
- abt dd mmm yyyy, abt mmm yyyy, and abt yyyy, where the 'abt' indicates about. Aft and Bef can also be used to indicate After or Before.
- Any of the above formats can be enclosed in brackets '[ ]' to indicate the date is not certain.
- Finally, the following text are also allowed: NBD, NDD, Infant, No Stone, See Notes, Unreadable, Broken Stone, and Buried Stone, where NBD indicates No Birth Date, and NDD indicates No Death Date.
Tab 2 - Images
The fields on this tab are used to indicate the various types of images used across the system. Enter only the file name of the image.
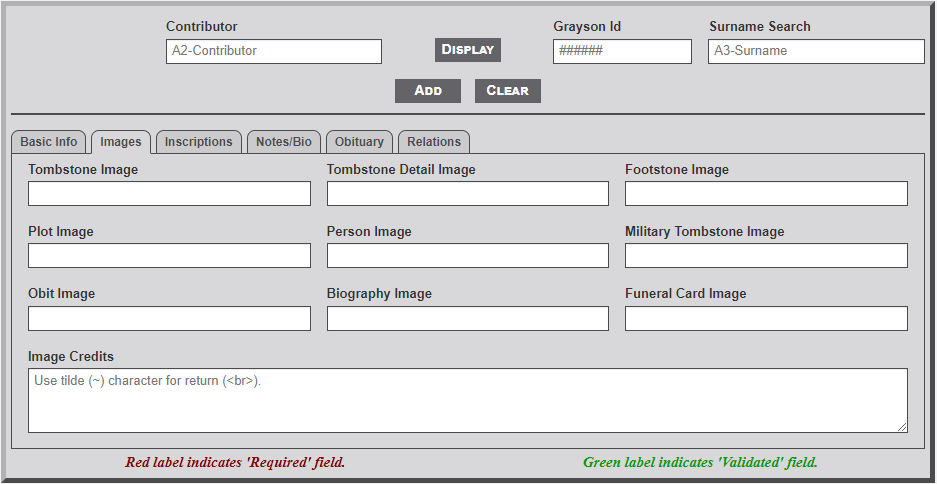
Individual Fields
- Tombstone - File name of the tombstone marker image for the individual. This is generally a full image photo of the tombstone.
- Tombstone Detail - File name of the tombstone detail. This image is a close-up of the tombstone showing the name and dates only.
- Footstone - File name of the footstone marker image of the burial plot.
- Plot - File name of the plot image. This is is generally a wide-angle view of the burial plot and surrounding area.
- Person - File name of the personal image of the individual.
- Military Tombstone - File name of the military marker image of the individual.
- Obit - File name of the published image of the obituary. See the Image section below for additional information related to images.
- Biography - File name of the published image of the Biography or related photos for the individual. See the Image section below for additional information related to images.
- Funeral Card - File name of the Funeral Home Card used at the memorial or graveside service. See the Image section below for additional information related to images.
- Image Credits - This field is used to enter the source/credit information for individual images. Enter text that identifies the type of photo and the contributor (e.g., Tombstone photo provided by Bob Smith, used by permission.). If the contributor is included in the database contributor table then include the contributor Id number rather than the name (e.g., Tombstone photo provided by |24|, used by permission.).
Entering Image Names
The website follows a somewhat loose structure for naming memorial images. For ease of reference the file name should begin with the last name of the individual and include at least the first name. Each name should be separated with the underscore character (_). Although not required it is beneficial to include one of the following codes at the end of the name. as follows: lastname_firstname_xxx.jpg, where xxx is a code for the type image.
- tbs - tombstone
- dtl - tombstone detail
- fst - footstone
- plt - plot
- pic - personal picture
- mil - military
- obt - obituary
- bio - biography
- fhc - funeral home card
- If a code is not included, the file is assumed to represent a tombstone.
- Selecting the alt-n keys with an image field selected will create an image name in the field in the system format.
- Do not include the path to the file name (e.g., lastname_firstname_code.jpg only).
- Multiple images can be included by separating the file names with a pipe ( | ) character.
- The first image of the Tombstone Image field is placed above the link buttons on the memorial record.
Tab 3 - Inscriptions
The fields on this tab are used to provide a transcription of the tombstone and military notes of interest. HTML tags are not allowed in the fields.
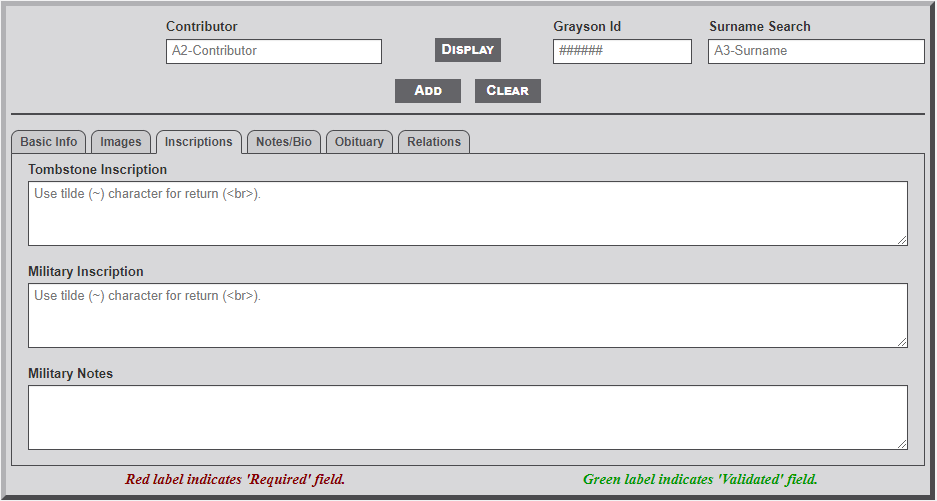
Individual Fields
- Tombstone Inscription - Text of the tombstone inscription. Enter the inscription from as written. The tilde ( ~ ) character can be used to begin a new line.
- Military Inscription - Text of the military inscription on the tombstone. Enter the inscription as written. The tilde ( ~ ) character can be used to begin a new line.
- Military Notes - Text of military information related to the individual. Military information is often provided in the obituary. Statements such as, "He served in US Army in World War II" in the obituary should be included in this field. The main site section for Military Information uses this field to select individual records for display.
Tab 4 - Notes/Bio
The fields on this tab are used to provide additional research notes, Death Certificate transcription, Obituary records, and Biography information.
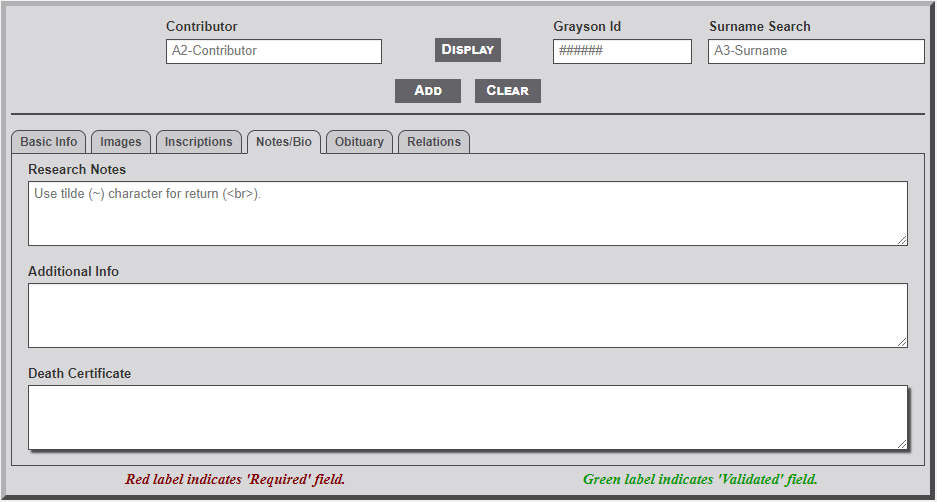
Individual Fields
- Research Notes - Text of any research notes relative to the individual. Information generally included in this field relates to the source of other information within the record, For example, stating that the middle name of an individual was obtained from the obituary of a relative.
- Additional Info - This field is used to include any additional information that is relevant to the individual. The field will accept HTML code for formatting. The tilde ( ~ ) character can be used for end/beginning of paragraph (e.g., the tilde character replaces the paired HTML tags of </p><p>).
- Death Certificate - Transcribed state death certificate for the individual. Generally the source for Death Certificates is either the Texas State Department of Health or Death Certificate records. Both are found at the FamilySearch.com website. See the Appendix section for template form available for use.
Tab 5 - Obituary
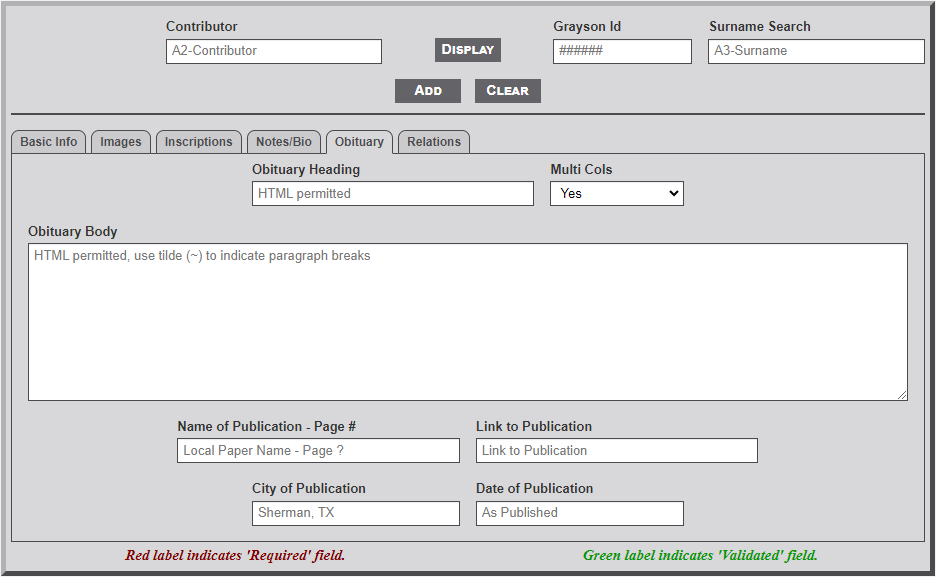
Individual Fields
- Obituary Heading - This is the heading (i.e., Name of the individual) that will display at the top of the obituary.
- Multi Cols - This indicates whether the obituary should display in one or two column format. Generally, shorter obituaries should display in single column format and longer obituaries in dual column format.
- Obituary Body - This is the main body of the obituary. HTML formatting is allowed in this field. Note that rather using the normal <p></p> around a paragraph the tilde (~) character can be used to replace the paragraph end and start tags (e.g., ~ is replace with </p><p>. Don't forget to include the paragraph start tag, <p> before the first paragraph. And also, the paragraph end tag, </p> at the end of the last paragraph.
- Name of Publication - Name of the publication, if known (e.g., Denison Herald). Enter the page number here also.
- Link to Publication - Include a link to the publication.
- City of Publication - City where the obituary was published, (e.g., Sherman, TX)
- Date of Publication - Date of the publication (e.g., March 20, 2024)
Tab 6 - Relations
The Relations fields are used to identify next of kin relatives of the individual.
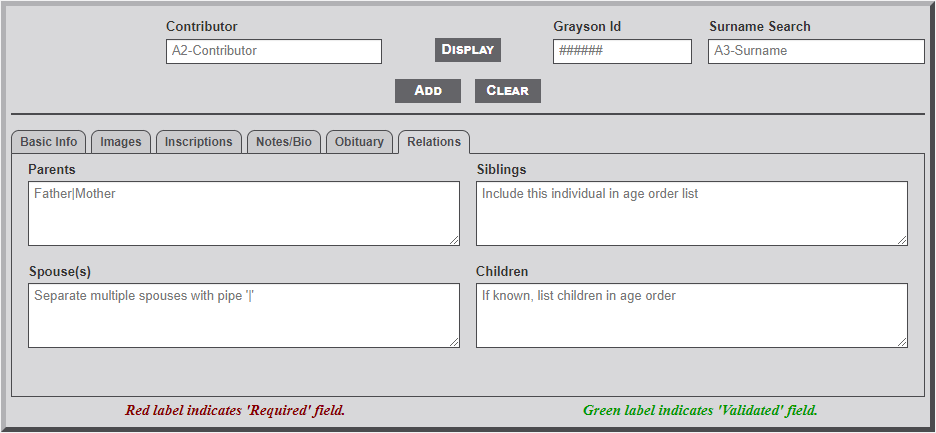
Individual Fields
- Parents - Names or Memorial ID numbers for the parents of the individual. See the section below for details on entering relations.
- Siblings - Names or Memorial ID numbers for the siblings of the individual. See the section below for details on entering relations.
- Spouse - Name(s) or Memorial ID number(s) for the spouse of the individual. See the section below for details on entering relations.
- Children - Names or Memorial ID numbers for the children of the individual. See the section below for details on entering relations.
Entering Relations
Relations may be entered in one of three ways...
- If the relative is still living enter the full name. If known, enter the maiden name of the relative, as... <em>Maiden Name</em>. This will cause the maiden name to appear in italic (e.g., Mary Jane <em>Smith</em> Jones will display as Mary Jane Smith Jones).
- If the relative is buried in the county and has a Memorial record simply enter the record ID number. Use the Search Name input box as mentioned above to quickly search for the Id number of the relative. Caution: When using the Search Name box do not select the name found in the list as this will populate the form with the information from the selected record. Simply make note of the relatives number for entering it into the desired relations field.
- If the relative is deceased but not buried in the county go to the FiindAGrave.com website to locate the FaG record number. If not found simply enter the full name as indicated above. If found enter the FaG memorial number as follows... <fg "m=nnnnnnnnnnn">Name of Relative</fg>, where nnnnnnnnnnn is the FaG memorial number.
- Separate individual relatives with the pipe ( | ) character.
- When entering the siblings include the memorial Id of the individual in the list. Use the Family Search website to locate census records to determine the genealogical order of the siblings.
- Occasionally there may be a need in the Children field to further identify specific children of multiple spouses. This is accomplished by specific tags as follows: <s1></s1>|Child1|Child2|<s2></s2>|Child3|<s3>|</s3>|Child4.
- It may occasionally be necessary in the Sibling field to indicate half-siblings of the individual. This is accomplished using a special tag structure... Sibling1|Sibling2|<hs></hs>|Sibling3.
- To verify an entry in any of the fields simply select the desired Id number and select the F2 key (PC) or F7 key (Mac). This will display the number and name at the bottom of the form.
No Comments