Churches
Purpose
The Churches admin module is used to add, edit, or delete individual cemetery records in the churches table of the database.
Overview
The module contains multiple fields on the Basic Info and Text Info tabs for entering the desired information. See the Basic Module Structure page for detailed use of the buttons at the top, the form, and the table below the form.
Basic Info - Tab 1
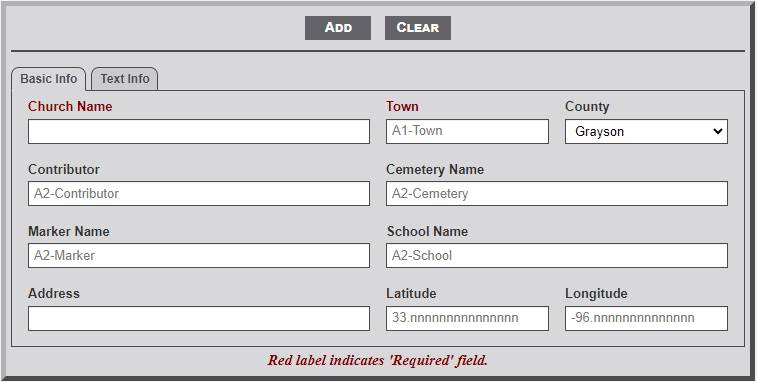
Input Fields
- Church Name - Enter the name of the church as it appears on the church sign or printed material.
- Town - After entering one letter of the town name a dropdown menu will appear listing the town names that begin with the entered letters. Continue to type the name to further filter the selection list. Select the desired town name from the list.
- County - Use the dropdown menu to select the county in which the church resides. Grayson Co. is set as the default.
- Contributor - After entering two letters of the contributor's last name a dropdown menu will appear listing the contributor names that begin with the entered letters. Continue to type the name to further filter the selection list. Select the desired contributor name from the list. The contributor's name will appear on the individual church page.
- Cemetery Name - In some cases the church will be associated with a specific cemetery, most usually located on the church property. After entering two letters of the cemetery's name a dropdown menu will appear listing the cemetery names that begin with the entered letters. Continue to type the name to further filter the selection list. Select the desired cemetery name from the list. The cemetery name is used to display a link to the cemetery record in the text area below the line on the individual church page.
- Marker Name - In some cases the church will be associated with an Historical Marker. After entering two letters of the marker's name a dropdown menu will appear listing the marker names that begin with the entered letters. Continue to type the name to further filter the selection list. Select the desired marker name from the list. The marker name is used to display a link to the marker record in the text area below the line on the individual church page.
- School Name - On some occasions it might be the case that the church is associated with a school. After entering two letters of the school's name a dropdown menu will appear listing the school names that begin with the entered letters. Continue to type the name to further filter the selection list. Select the desired school name from the list. The school name is used to display a link to the school record in the text area below the line on the individual church page.
- Address - Enter the address of the school.
- Latitude - If known, add the GPS latitude coordinate in this field. Note: the placeholder format for the entry. First two digits must be 33, followed by a period and six digits.
- Longitude - If known, add the GPS longitude coordinate in this field. Note: the placeholder format for the entry. First three digits must be -96, followed by a period and six digits.
If the Lat/Lon coordinates are entered the shadow box to the right of the cemetery image will display a small map showing the location with a link below the map to a Google map with the location.
Text Info - Tab 2
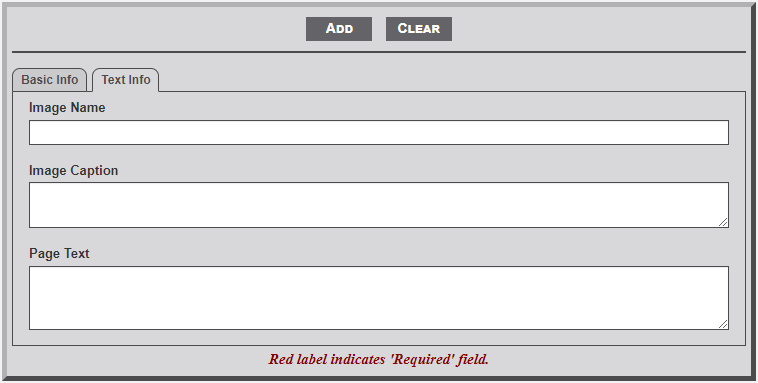
Input Fields
- Image Name - Enter the name of the image to be displayed on the individual church page. All church images should be stored in the chu_images subfolder of the main images folder.
- Image Caption - Enter a caption to appear below the image of the church.
- Page Text - This field is used to enter church related information that will display below the line on the individual church page. A short history of the church is most appropriate. HTML is allowed.
No Comments